The STM32 HAL (Hardware Abstraction Layer) speeds up development cycles, makes switching between STM32 processors a breeze and has a huge support community. The HAL is part of the STM32CubeIDE tool set which allows users to auto-generate code for various STM32 peripherals. The HAL can be thought of as a highly abstracted library which is almost universal between STM32 processors. The STM32 HAL can be a very useful tool but there are also downsides. Using the HAL can create bloat, give a false sense of understanding the hardware and only generates embedded C code. What if you want to use C++ in a project? C++ is becoming more popular in embedded environments as memory gets larger / cheaper, programs get more complicated and code re-use is essential. This post is one of the most comprehensive tutorials showing how to mix C++ with STM32 HAL.
At a high level, this tutorial shows how to control the HAL GPIOs and Timers from C++. In order to do this, a “C++ event loop” is created which will act as the C++ entry point called from main.c. Then a C++ GPIO wrapper class is created in order to control the GPIO pins through the HAL from the C++ event loop. After this, I will give a brief outline of interrupt handling for Timer Modules and UARTs/SPI using the HAL in C++. All of the code used in this tutorial can be found in the following GitHub repository, stm32-hal-with-cpp.
Getting Started:
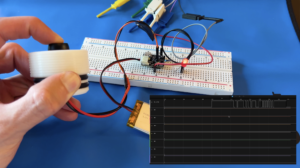
I will be completing this tutorial with the STM32L475, specifically the B-L475E-IOT01A development kit, but the same principles should apply to any STM32 board capable of leveraging the HAL.
First, open a new project and generate the HAL for whatever peripherals that will be used in the project. Within STM32CubeIDE, click file->new->STM32 Project. Search the specific development kit or processor that will be used for the project and click next. Name the project and place it in the desired workspace location. Next, be sure to click “C++” as the targeted language, “Executable” as the binary type and “STM32Cube” as the project type. Click next, then finish. STM32CubeIDE will ask if you would like to initialize all peripherals as default and generate, click yes. The .ioc file should automatically open at this point. This is where any peripherals that will be used in the project are configured.
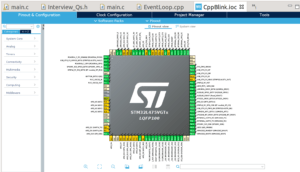
.ioc View
For this tutorial, we will be looking at the GPIO view, as shown above, and the Timer view. The following link gives a more in depth exploration of the .ioc view, STM32CubeMX Tutorial. Note that this is based on an older version of the tool but should still apply.
As shown in the GPIO view above, The B-L475E-IOT01A defines the on board green LED as GPIO PB14 named, LED2. This is the GPIO pin we will wrap into our C++ project.
C++ Event Loop
The “event loop” will act as our C++ entry point when mixing C++ with STM32. Since the HAL generates a main.c file, we need to call into a C++ function in order to leverage C++ features. Create a new header file named “EventLoop.hpp” and a new source file named “EventLoop.cpp”. Within EventLoop.hpp, create a C and C++ version of the EventLoop() function as shown below. The extern “C” block allows the creation of C code embedded within a C++ file. main.c will call into the C version and the C version will call into the C++ version. This round about way of calling the C++ EventLoop() function is needed since main.c cannot call directly into a C++ function.
EventLoop.hpp:
#ifndef EVENTLOOP_HPP_
#define EVENTLOOP_HPP_

#include <stdint.h>
#include <stdio.h>

void EventLoopCpp();   // Cpp function to call into main event loop

#ifdef __cplusplus
extern "C"
{
#endif
    void EventLoopC();  // C function to call into Cpp event loop from main
#ifdef __cplusplus
}
#endif

#endif /* EVENTLOOP_HPP_ */
EventLoop.cpp:
#include "EventLoop.hpp"

// Main Cpp event loop to run application
void EventLoopCpp()
{

}

// Define all C function calls from main.c below
extern "C"
{
    void EventLoopC()
    {
        EventLoopCpp();
    }
}
Defining Classes within the C++ Event Loop
Now that we have a C++ entry point from main.c, we need to test that C++ specific code will actually run here. To do this, create an empty class to test with. We will create a test class with a dummy constructor where our blink functionality will eventually live. Create “CppLedBlink.hpp” and “CppLedBlink.cpp”.
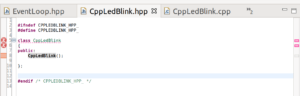
CppLedBlink.hpp:
#ifndef CPPLEDBLINK_HPP_
#define CPPLEDBLINK_HPP_

class CppLedBlink
{
public:
    CppLedBlink();
};

#endif /* CPPLEDBLINK_HPP_ */
CppLedBlink.cpp:
#include "CppLedBlink.hpp"

// Dummy constructor for testing C++
CppLedBlink::CppLedBlink()
{
    int test = 1;
}
Now this next point is maybe the most important thing to keep in mind when mixing C++ with STM32 HAL. How you include this class into the EventLoop files will make or break your program. If you try to include the CppLedBlink class the conventional way through the EventLoop.hpp header file, you will get the error, “unknown type name ‘class'”. This is because main.c includes EventLoop.hpp so it will be compiled with the C compiler instead of the C++ compiler. EventLoop.cpp will be compiled with the C++ compiler, so any C++ specific code needs to be located within EventLoop.cpp.
Error in CppLedBlink.hpp
The trick is that you have include the CppLedBlink.hpp in the EventLoop.cpp file instead. Now within the EventLoop.cpp, edit the EventLoopCpp() function to instantiate a CppLedBlink object. There should be no errors.
#include "EventLoop.hpp"

// Main Cpp event loop to run application
void EventLoopCpp()
{
    CppLedBlink testing;
}

// Define all C function calls from main.c below
extern "C"
{
    void EventLoopC()
    {
        EventLoopCpp();
    }
}
Last, make sure that the EventLoop.hpp is included in main.c within the /* USER CODE BEGIN Includes */ and /* USER CODE END Includes */. Then call into the EventLoopC() function above the main while(1) loop as shown below.
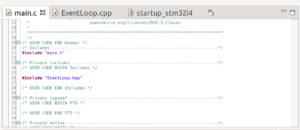
Include EventLoop.hpp in main.c
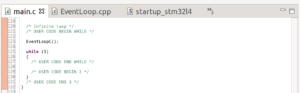
Call into EventLoopC() from main.c
Wrapping HAL GPIO
Now that we are up and running C++ with STM32, we want to leverage the HAL. To do this, we will create two C++ classes to wrap the GPIO HAL functions. The first class will define a GPIO pin and have member functions for toggling, reading, clearing and setting a GPIO pin. These member functions utilize the GPIO HAL to accomplish each task. The second class defines a pinout for the specific project and will have members for all needed GPIO pins.
The HAL GPIO pin definitions consist of a “pin” which is just defined as a uint16_t and a “port” which is defined as a “GPIO_TypeDef” struct. Therefore, our GPIO pin class will need a uint16_t and a pointer to a GPIO_TypeDef passed into it. The GPIO_TypeDef and related GPIO HAL functions are included within the file, “stm32l4xx_hal.h”. This file will be named with respect to which processor or dev kit is being used.
GpioPin.hpp:
#ifndef GPIOPIN_HPP_
#define GPIOPIN_HPP_

#include "stm32l4xx_hal.h"

class GpioPin
{
public:
    GpioPin(uint16_t pin, GPIO_TypeDef* port);   // Constructor

    bool Read();
    void Set();
    void Clear();
    void Toggle();

private:
    uint16_t mGpioPin;
    GPIO_TypeDef* mGpioPort;
};

#endif /* GPIOPIN_HPP_ */
GpioPin.cpp:
#include "GpioPin.hpp"

GpioPin::GpioPin(uint16_t pin, GPIO_TypeDef* port)
    :
    mGpioPin(pin),
    mGpioPort(port)
{
}

bool GpioPin::Read()
{
    return HAL_GPIO_ReadPin(mGpioPort, mGpioPin);
}

void GpioPin::Set()
{
    HAL_GPIO_WritePin(mGpioPort, mGpioPin, GPIO_PIN_SET);
}

void GpioPin::Clear()
{
    HAL_GPIO_WritePin(mGpioPort, mGpioPin, GPIO_PIN_CLEAR);
}

void GpioPin::Toggle()
{
    HAL_GPIO_TogglePin(mGpioPort, mGpioPin);
}
The HAL GPIO pins and ports for an auto-generated project are located in main.h. So after setting up a GPIO pin as needed in the .ioc view, we can pull it from main.h into our C++ project through a Pinout class. Within the Pinout class we define whatever GPIO pins we want as GpioPin objects (see above). These will be public members so that we can access each GPIO member from outside the class scope. We then pass in whatever GPIOs we want into our constructor initializer list from main.h.
CppBlinkPinout.hpp
#ifndef CPPBLINKPINOUT_HPP_
#define CPPBLINKPINOUT_HPP_

#include "GpioPin.hpp"
#include "main.h"

class CppBlinkPinout
{
public:
    CppBlinkPinout();

    // Define all wanted GPIO pins for specific project below
    GpioPin mTestLed;
};

#endif /* CPPBLINKPINOUT_HPP_ */
CppBlinkPinout.cpp
#include "CppBlinkPinout.hpp"

CppBlinkPinout::CppBlinkPinout()
    :
    // Wrap all GPIO pins / ports into project from main.h
    mTestLed(LED2_Pin, LED2_GPIO_Port)
{
}
Putting it all Together
The last step is putting everything together to show an actual LED blinking on our C++ with STM32 project. Go back to the CppLedBlink class and add in a private CppBlinkPinout member. This will be used to blink the LED within the CppLedBlink class. For now, a simple for loop delay is used to toggle the LED but the HAL_Delay() function could also be used. We will also briefly explore how to integrate the timer modules into the C++ project which could also be used to create the delay.
CppLedBlink.hpp:
#ifndef CPPLEDBLINK_HPP_
#define CPPLEDBLINK_HPP_

#include "CppBlinkPinout.hpp"

class CppLedBlink
{
public:
    CppLedBlink();

private:
    CppBlinkPinout mPinout;
};

#endif /* CPPLEDBLINK_HPP_ */
CppLedBlink.cpp:
#include "CppLedBlink.hpp"

// Dummy constructor for testing C++
CppLedBlink::CppLedBlink()
{
    while(1)
    {
        for(int i = 0; i < 1000000; i++);
        mPinout.mTestLed.Toggle();
    }

}
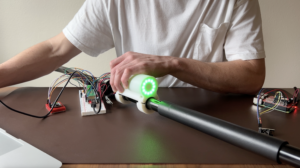
 Success!
Going Further
When mixing C++ with STM32, there are many more peripherals one might need aside form just GPIO. This section will give an overview of how to integrate the HAL timer modules and UART / SPI with C++.
Leveraging these peripherals with the HAL and C++ requires implementing an interface initialization function that is called from main.c and links all HAL components from the C side, to the C++ side.
Timers
Hardware timers continually run and are set to interrupt on overflow or “period” events. These interrupts will be handled through the HAL / C side of the application. On an overflow interruption, a timer overflow variable will be incremented in order to track how many times our timer has overflowed. We will create interfacing functions within main.c that allow the hardware timer and overflow variables to be read. These interfacing functions will be passed to the C++ side as function pointers through an “initialization” function called from main.c.
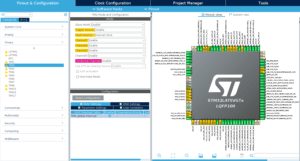
Use the .ioc configuration view to initialize a hardware timer. This example will use Timer 2 set as a 32 bit timer running at 1Mhz. Since the internal clock for the STM32L475 is running at 80MHz, the pre-scaler will be set to 80 to create a clock speed of 1Mhz. The actual value will be set to pre-scaler – 1 or 79. The count mode will be left in “Up” mode and the period will be left at the maximum value.

Configure Timer within .ioc View
Enabled Timer Interrupts
The STM32 HAL interrupts uses pre-defined “callback” functions that can be re-defined in main.c in order to achieve some desired functionality on interruption. These functions are defined as “weak” since they are meant to be overridden by the user. The timer interrupt callback functions are located at Drivers/STM32L4xx_HAL_Drivers/Src/stm32l4xx_hal_tim.c. For now just copy the HAL_TIM_PeriodElapsedCallback() function from this file into main.c and remove the __weak tag as shown below.
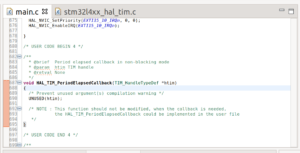
Period Elapsed Callback in main.c User Code Section 4
Within main.c, create a new global variable timerOverflow and increment it within the timer callback.
// Above main
volatile uint32_t timerOverflow = 0;

// Callback re-defined within main.c
void HAL_TIM_PeriodElapsedCallback(TIM_HandleTypeDef *htim)
{
    /* Prevent unused argument(s) compilation warning */
    UNUSED(him);

    // Ensure that it was timer 2 that interrupted
    if(htim == htim2)
    {
        timerOverflow++;
    }
}
Once the timer interrupt and callback is set up, we need to start the timer and then create the interface to the C++ side.
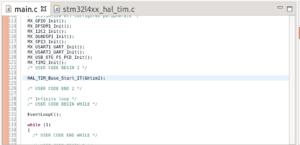
Start Timers within main.c
Create a functions within main.c to read the hardware timer value and the timer overflow variable.
uint32_t ReadHardwareTimer()
{
    uint32_t count = htim2.Instance->CNT;
    return count;
}

uint32_t ReadTimerOverflow()
{
    return timerOverflow;
}
Then back in C++ EventLoop, create an initialization function where we can pass functions from main.c into the C++ side through function pointers.
EventLoop.hpp:
#ifndef EVENTLOOP_HPP_
#define EVENTLOOP_HPP_

#include <stdint.h>
#include <stdio.h>

// Define func pointers for reading hw timers and timer overflows
typedef uin32_t (*ReadHwTimer)();
typedef uint32_t (*ReadOverflow)();

void EventLoopCpp();   // Cpp function to call into main event loop

#ifdef __cplusplus
extern "C"
{
#endif
    void EventLoopC();   // C function to call into Cpp event loop from main.
    void InitializeInterface(ReadHwTimer readHwTimer, ReadOverflow readTimerOverFlow);
#ifdef __cplusplus
}
#endif

#endif /* EVENTLOOP_HPP_ */
EventLoop.cpp:
#include "EventLoop.hpp"

// Main Cpp event loop to run application
void EventLoopCpp()
{
    CppLedBlink testing;
}

// Define all C function calls from main.c below
extern "C"
{
    void EventLoopC()
    {
        EventLoopCpp();
    }

    void InitializeInterface(ReadHwTimer readHwTimer, ReadOverflow readTimerOverFlow)
    {
        /*
        * Can now link these function pointers to any C++ class for use.
        * For example, Could pass them into a static global system time
        * class where they would be used to calculate the ongoing system
        * time from system startup.
        */
    }
}
Lastly, call the initialization function in main.c before calling into the C++ EventLoop and pass in the ReadHardwareTimer() and ReadTimerOverflow() functions. These function pointers can now be passed to any global C++ objects in the EventLoop.cpp file. For example, they could be passed into a system time class that can read into them to calculate the overall time passed since program startup.
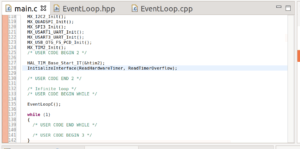
Call to Initialization Interface within main.c
UART/SPI
The UART and SPI HAL interfaces use a UART_HandleTypeDef or SPI_HandleTypeDef struct that defines things like buffer sizes, error codes and function pointers to specific interrupt service routines (ISRs). When an interrupt is triggered for UART or SPI, the respective ISR is called through that function pointer within the lower level HAL code. Because of this, it is possible to write a custom ISR and link the UART_HandleTypeDef / SPI_HandleTypeDef to this new custom ISR.
A good example of this is a UART Tx ISR. A custom Tx UART ISR could be implemented in an extern C block so that any bytes contained in a specific buffer are sent out the UART Tx line before disabling the Tx interrupt. Then similar to the timer ReadHardwareTimer() or ReadTimerOverflow() function pointer implementation above, a function pointer could be used to enable the UART Tx interrupt anytime that specific buffer is written to within the C++ side. It is not too difficult creating a custom ISR for UARTs or SPI since the built in HAL functions can be used as references. Look to HAL_UART_Transmit_IT() and HAL_UART_Recieve_IT() as examples to get started.
If you found this content interesting or useful, buy me a coffee!
Bitcoin Wallet:
bc1q0vkx34w5y4yt5nq38a4rvk7gvgnxm2xv5lvyft